
Curbless vs Curbed Shower: How Much the Floor Has to Drop
The slope a shower floor needs, the arithmetic for a centre or linear drain, and what a curbless entry asks of wood joists or a basement slab in Alberta.
By David Hutten, Owner, Green Ladder Contractors
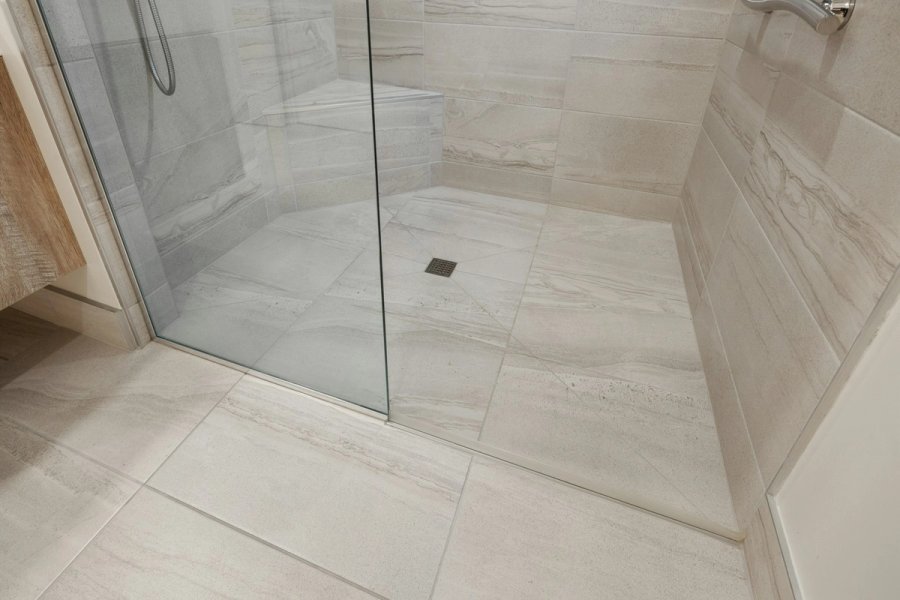
A shower floor falls 1/4" per foot (about 2%) to the drain, so a 36" x 60" shower with a centre drain rises 5/8" to its far walls and wants about 1 5/8" from the subfloor to the top of a mortar bed, before any tile. A curbed shower builds all of that on top of the bathroom floor. A curbless one has to find it in the joists or the slab.
A curbed shower and a curbless one can share the same tile, glass and valve. What separates them is underneath. A curb lets the shower floor sit on top of the bathroom floor and hold its water behind a step. A curbless shower has to move its water away from the bathroom with nothing to stop it, so the shower floor has to go down into the structure. How far down can usually be worked out on paper before anybody opens a floor.
Where the 1/4" per foot comes from
Almost every guide gives the slope as 1/4" per foot, about 2%. That figure is sound, and it comes from the American plumbing codes and the tile industry. The American residential code asks for a finished shower floor sloped between 2% and 4% (1/4" to 1/2" per foot).
The National Plumbing Code of Canada 2020, in force in Alberta since April 2023, does not put a number on it for a house shower. Article 2.2.2.3 asks that a shower receptor be built so water cannot leak through the walls or the floor, and where 2 or more heads share a drain, that the floor slopes so water from one head cannot run across the area of another.
So the 1/4" per foot you will see on a drawing here comes from the system makers. Schluter's installation handbook slopes its mortar beds at 1/4" per 12" to the drain, and the Ceramic Tile Education Foundation works from the same figure. In Alberta it is a manufacturer and tile industry instruction, and the plumbing code leaves the method to them (which is fine, the number works).
The arithmetic on a real shower
The rise is 1/4" for every foot the water travels to the drain.
A 36" x 48" shower with a centre drain. The farthest walls are 24" from the drain, so the floor rises 1/2" to the walls. The near walls, 18" away, take the same 1/2" a little more steeply.
A 36" x 60" shower with a centre drain. The far walls are 30" away, so 5/8".
The same 36" x 60" shower with a linear drain along the back wall. Water travels the full 36" depth, so 3/4". Put the linear drain across the 36" end instead and the water travels 60", which is 1 1/4".
That last pair surprises people - a linear drain does not always mean a shallower floor. What it gives you is one sloped plane, so large tile can run across without the 4 way cuts a centre drain needs, and the entry edge can sit dead level with the bathroom floor.
Then add the bed under the drain. Schluter asks for at least 1" of mortar around the flange of its centre drain over a wood subfloor. So a 60" mortar bed shower with a centre drain wants about 1 5/8" from the subfloor to the top of the bed at the walls, before any tile. Foam trays are thinner, and each one publishes its own heights.
A curbed shower: the floor just sits higher
With a curb, all of that build-up sits on top of the existing subfloor, and the curb holds the water in. The American residential code sets a curb at 2" to 9" measured from the top of the drain to the top of the curb, with the curb at least 1" lower than the sides and back. The National Plumbing Code does not set a curb height at all, so the curb is settled by the waterproofing system, the glass, and how easy it needs to be to step over.
The trade-off is that step, which is the part that gets in the way for somebody with a walker, a cane or a sore knee.
A curbless shower: the floor has to drop
With no step, the shower floor at the entry has to sit at or below the finished bathroom floor, and everything else falls from there. So the whole build-up (the 1 5/8" above, or whatever the chosen tray needs) has to come out of the structure.
Over wood joists there are 3 ways to find it.
Drop the subfloor between the joists. Schluter's recessed curbless detail sets a new subfloor down between the joists on ledgers fastened to their sides, with blocking, and leaves the joists at full depth. Their handbook calls for joists at no more than 19" OC and covers dimensional lumber only. For engineered joists it sends you to the joist manufacturer, and it says dimensional lumber is not to be ripped down.
Leave the joists alone and raise the rest of the room. Building the bathroom floor up by the same amount does the same job, with a small step at the door in exchange.
Change the framing. Article 9.23.5.2 of the National Building Code 2023 Alberta Edition only allows a notch on the top of a floor joist within half the joist depth of its bearing, and no deeper than a third of the joist depth. A shower in the middle of a span is nowhere near the bearing. Lowering joists, sistering them, or heading off and reframing a section is a structural change, and framing outside the span tables gets designed under Article 9.4.1.1, which in practice usually means an engineer. Schluter's handbook says recessing a bathroom floor has to keep the structure sound and may need a design professional.
Which of those you get is found from below, by which way the joists run against the drain and what the joists are. Sawn joists over an unfinished basement are usually a lot easier to work with than engineered joists over a finished ceiling.
The drain pipe needs its own fall too. The plumbing code asks for drainage pipe of 3" and under to slope at least 2% (a drop of 1 for every 50 along the pipe), and limits a fixture outlet pipe to 1200 mm (about 47") of developed length. Joist direction decides whether that run fits inside the floor.
On a basement slab
In a basement the work is cutting the slab around the shower, trenching for the drain and trap, and pouring back lower. The Alberta code asks for a slab at least 75 mm (about 3") thick, and asks floors on the ground to be protected from soil gas by an air barrier (Article 9.13.4.2), so the patch is detailed with both in mind. There are no joists to work around, so a curbless shower in a basement is often the more straightforward of the 2.
Waterproofing a curbless floor
The layers are in bathroom waterproofing behind tile, and none of that changes. What changes for curbless is how far it goes. Schluter's handbook asks for waterproofing on every floor area exposed to water, the wet area and the drying area outside it, sealed where floor meets wall, and a temporary dam across the entry for the flood test.
Glass and keeping the water in
Where the linear drain sits at the entry, Schluter recommends drainage openings that span the full width of the opening, and notes that a secondary drain may be needed in the drying area. A fixed glass panel and a shower head aimed away from the opening help as well.
Whatever the layout, shower glass in Alberta has to be Class A safety glazing to CAN/CGSB-12.1 (Article 9.31.2.4, which points to 9.6.1.4.).
What else the codes say about the shower
Table 2.4.9.3 of the National Plumbing Code sizes a shower drain by the total flow of every head and body spray on it. Under 9.5 litres a minute takes a 1 1/2" drain, 9.5 to 20 litres a minute takes 2", and over 20 takes 3". A rain head plus a hand shower can move a shower up a size, so the fixtures are worth settling before the floor is opened.
Every shower gets a pressure balancing or thermostatic valve (an automatic compensating valve, in the code's words), and water from the head is limited to 49°C (Article 2.2.10.7).
Grab bars, where installed, have to resist 1.3 kN (Article 9.31.2.3), so blocking is worth putting in while the wall is open.
Barrier-free, and what applies to a house
The barrier-free shower rules in the Alberta building code sit in Section 3.8, and Article 3.8.2.1 exempts houses (detached, semi-detached, with a secondary suite, and townhouses among others). Nothing requires a house shower to be curbless.
As a yardstick for planning ahead, Article 3.8.3.17 asks for a shower at least 1500 mm wide and 900 mm deep (about 59" x 35 1/2"), a clear space in front of it 900 mm deep, and a threshold no more than 13 mm (about 1/2") high, bevelled where it is over 6 mm (about 1/4"). That 1/2" is a fair working target for a curbless entry in a house.
Before you choose
Shower size and drain position first, then the slope arithmetic, then a look at the joists or the slab from underneath. In that order you know how far the floor has to come down before the tile is picked. A curb is the simpler build, and curbless is very achievable in a lot of Red Deer houses once that check is done.
We are happy to look at the floor from below and work out on a drawing what a curbless entry would take in your bathroom.
Bathroom Renovations
Bathroom renovations and remodels in Red Deer and Central Alberta, with proper waterproofing behind the tile.
See Our Bathroom Renovations Work →Before you sign a quote: What a complete bathroom quote includes
Ones we built
More from the Green Ladder Blog
David Hutten
Owner, Green Ladder Contractors
David Hutten started building at age 10 and has more than 30 years of hands-on construction experience. Green Ladder Contractors renovates kitchens, bathrooms and basements and builds home additions, garages and decks across Red Deer and Central Alberta.
Ready to start your project?
Book a free 15-minute discovery call. We'll walk through your vision, budget, and timeline.